Managing multiple users on an Account
We recommend setting up different users within your IWannaTicket Account if multiple people or departments have access to it. This means that each user has their own unique log in with corresponding privileges based on what exactly they need to access.
If you have not already set up different users you can learn how to set this up here first.
It is a good idea for each user to be assigned varying levels of access to the rest of your account, rather than every person having the privilege to edit and make changes to everything in your account.
We call these ‘roles’, which allow you to create unique log-ins for all persons involved with your event and account. (In short, each role can be configured to only give the user access to exactly what you want them to be able to see and do for the job they need to do.)
When you are adding each user, a few tick box options will appear. These relate to the restrictions and privileges that you can assign to each role. You can also edit these at any time if you want to reduce or increase their privileges.
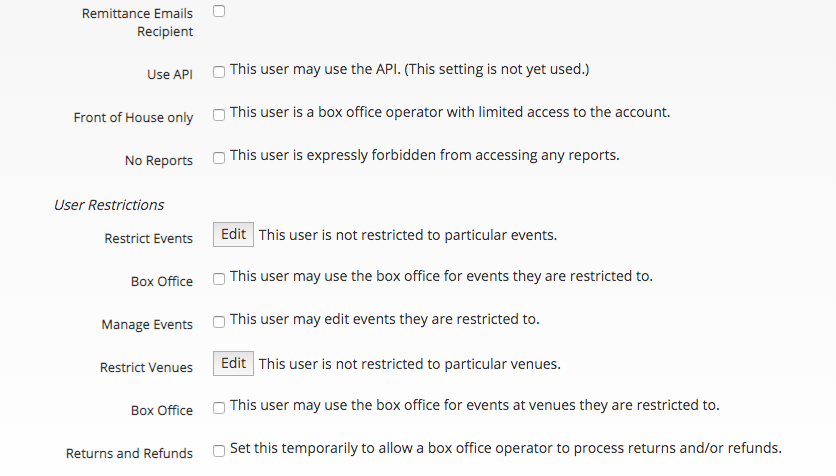
What does each of the following privileges allow the user to do?
Remittance Emails Recipient: When events funds have been transferred, this person will be notified.
Use API: This setting is not used yet.
Front of House Only: The user will have access to the 'box office' and has the ability to use the ticket scanning options. This is great for on-the-day staff, who need to login to your event, but not have access to your event set up.
No Reports: By enabling this box, the user will be unable to access any reports related to the account or orders.
What restrictions can I apply to different roles?
Restrict events: You can limit access for a User to a single or multiple Events within your Account. A great tool if you have Associate Producers.
If you do not restrict the user to any event here, they will have access to all events listed in both current and past in your Account.
To select event/s start typing in the “search” box and the events will appear in the left column.
Click on any events you would like to select and they will then appear in the right column. Reverse the process should you wish to take access away.

Box Office: There are 2 tick boxes for Box Office. By selecting these tick boxes the user will be able to process sales via the Box Office for the events and venues that they are restricted to.
Manage events: This will allow the user to be able to make edits and changes to the events that they are restricted to, rather than just viewing it. For example, modifying the name or price of a ticket type.
Restrict venues: If your account has multiple venues that linked with the events you have on sale, you can restrict users to specific venues. For example, if they were working at the Box Office for a specific venue and not another. Once you have selected the events that you want the user to be able to see will appear in the ‘Selected Venues’ column on the right hand side.

Returns and refunds: This box gives the user the privilege to return and refund tickets (excluding the booking fee). We recommend that this privilege is not given to all users but rather turning it on temporarily if the situation arises.
Once you have configured the roles accordingly, each user should have varied permissions that can be changed or modified at any time.
Only an ADMIN User can amend the permissions of a User or ADD a new User. A restricted User only has the option to update their own password.
If you require any further assistance, please get in touch via support@iwannaticket.com.au and your Account Manager will be able to provide additional information.